Another accolade to the
Ottobre magazine I'm afraid. I am very impressed with these leggings. Made with stretch cotton jersey from the
Ottobre 3/2009 issue and they were a cinch. I made them in size 74cm intending that they would be too big for my 10 months old, however they fit perfectly now, so any more pairs I make will be the the next size up. I have some pink cotton jersey waiting to made into leggings too.

The applique flower came out a treat, it is two layers of different sized flowers embroidered together and then to one of the pant legs. I chose a slightly brighter blue for the cotton and hand embroidered it whilst watching some less than B-grade movie on television the other night. It was very rewarding.
A few months ago, I bought a twin needle from
Tessuti fabrics, after it was recommended by
Nichola of
Nikki-shell and I love it. It gave such a clean professional finish to the edges. And it was REALLY EASY TO USE!
All you have to do is go out and get yourself a twin needle and (apparently) it will work on any machine that can do a
zig zag stitch. You insert your fancy new needle as normal, then thread two threads through the machine (in exactly the same place as you would thread one). My sewing machine has a second spool holder (see pic), but if you didn't have that, you could just rig it up otherwise.

The bobbin is wound on as usual. You use a straight stitch and off you go! The top comes out as two straight parallel lines or stitching, and the bottom cotton does a
zig zag (which you don't see as it is on the wrong side of the garment).

(The hubby said I should have taken the picture from an angle so you could see the threads on the needle better without the machine foot in the way. Sorry about that. He also said I should have cleared the dining table in the background too...)
The beauty of using the twin needle is that not only is it easy and looks very professional, but is also allows stretching, so the stitching will stretch with the fabric, rather than break. Another fantastic sewing gadget to add to my repertoire. In my trial attempt before doing the actual leggings, I used two random cotton colours and it looked really good so I think this would make an interesting finish for another item one day.
I've since learned a few things from a
Kadiddlehopper post of using twin needles (as I am a learn as you do kind of girl, or jump in and do it, hope it works, then when it isn't perfect, do the research and find out what went wrong):
- I should have lowered the tension to make the material lie flat between the two layers of stitching (mine is a little mounded as the tension was a bit high).
- The two cotton spools should be positioned so they are rotating in opposite directions (although looking back at my picture, it looks like I unknowingly did this, must remember to knowingly do this again next time!)
- I found the two threads twisted around each other every now and then at the needles. Kadiddlehopper advice was to put one thread through the thread guide (above the needle), and leave the other out. I will try this next time.
Sooz has a great and very informative post on
sewing with knit fabrics (this reference is as much for me so I have a quick link to find it when I need it).
I can see more twin needle sewing in my future. My suggestion; go out and try it. I was very impressed.
 The cake was decorated in layers of bright coloured icing, to look like a stacking ring toy - the favourite toy at the moment. It was lovingly decorated by Camille, my sister, and received a squeal of delight (and hopefully recognition) when it was brought to the table.
 And those layers were brightly coloured! All in all a great day and lots of fun.
 I know. Who ever thought a knitted item would appear on this blog? I can't knit.

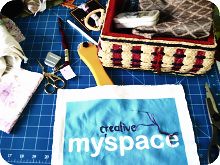
 Pull the contact off and you have yourself a great screen print!

 My mother's group are having a birthday party for all our babies this week as they are all turning 1 in the next month or so. I can't believe how quickly they grow up, however it is certainly a fun journey to see your little baby grow, develop and become a person (its times like these we forget about all the challenges and struggles along the way. Challenges? What challenges?) Anyway, I stray from the point. So, for the big birthday, Mum's group are doing a present for each of the babies, like a Kris Kringle.
 Its a four panel hat with a brim. I was really impressed with how it turned out. Never having made a hat before, I thought they would be tricky and fiddly. But it all went together easily and worked really well. The fabric I used had rather large, sparse pattern on it so all the pieces were strategically cut out to highlight the fabric. Classic pink spots to match on the binding and on the ties (under the chin, which I added as the pattern didn't have any). I can't imagine a child's hat without some sort of under chin tie as they always seem to be pulling them off. It is fortunate my Mum's group has 8 girl and only two boy babies, so a pink hat has good odds of finding the right home.
 A bit of refashioning work today, grabbing spare time when I can. The top is to match with these bright bloomers made a


 A pencil skirt with front pockets, three panels at the back with horizontal darts at the bum which give it a bit of difference and quite a nice shape. I added a bit of decorative lace to the two outer panels just for a bit of an edge.
 And here is Nic from
  A big thanks to Kirsty from


 Domenic with the amazing pavlova/preserved berries/


 Thanks for visiting. Have a great day!


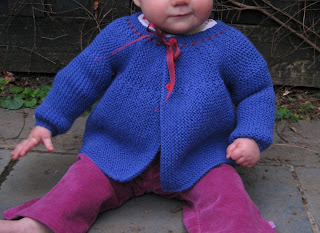
 Have been working on this little number for the past week. The top is the Toffee Tunic from the Summer issue (3/2009) of
 This is what I did:
 Because a lot of the finishing on the sleeve/leg bands was already done, they were whipped up in no time. One completed summer outfit - tick! Here it is in action.


 I've also entered the giveaway by A