Although it hasn't been a time completely void of crafting (but it must have been very busy with some other very important things, I'm sure...) I got into a bit of screen printing, or the very easy do-it-on-the-dining-room-table method using contact (the clear adhesive plastic used for covering books with), a sponge roller and some fabric ink.
Two projects came to life. A t shirt for my hubby for his birthday and a little decoration for a plain top for the baby. The t shirt is my favourite as it is of our (beautiful lovely friendly) dog Max, who can be seen in the non 2D version on our last camping trip here. I enlarged and printed out a favourite photo of Max. Traced the outline onto the contact. Using a sharp blade, cut out the shape from the contact so you are left with a reverse out of the picture. Then, you hold the sheet of contact over the t shirt, very carefully pull away the backing from the contact whilst trying to stick the contact flat to your item to be printed. This is the trickiest part really, particularly if you have a large picture to print!. Then, once it is stuck down well, you roll or paint your ink in the cut out.
 Pull the contact off and you have yourself a great screen print!
The print is then ironed from both sides, a lot! The fabric ink jar said to iron for 15 mins, but I can't imagine the fabric would have withstood that, so I just ironed it a lot. The pic is after it has been washed too, so obviously I ironed it enough to set the ink! (A quick iron might have made the final product look a little more impressive too, but I think I was all ironed out by that stage).
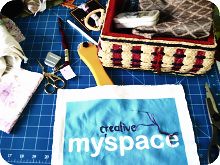
I'm sure there are plenty of good tutorials out there (with a few more photos - I always get so carried away in my projects, that I often forget to take photos until the very end!), however I learnt this simple technique at a workshop during the Melbourne Stitches and Craft Show from the very talented Tegan over at Ink & Spindle.The other print was the base of a daisy, inspired by a a small but obvious stain that I can't seem to remove in the wash. Not overly exciting yet, but this one is a work in progress, as I need to add some material and a bit of sewing to bring this to life. But the print is a start!


Welcome back blog buddy - you've been missed! Nice prints - contact printing is great for home and not too messy. Looking forward to see what you do with the daisy!
ReplyDeleteOooh, exciting! Love how the dog came up and I'm looking forward to the daisy with a bit of stitchery. Thread sketching, perchance?!
ReplyDeleteI did the workshop with Tegan too... you never know, we may have been in the same one! It took me forever to find some clear contact and since then I haven't actually done any printing, but this reminds me of how cool it is.
Poor hubby's birthday TODAY, wish I'd thought of this earlier! Dang...
Nice! What a fun technique!
ReplyDeleteVery cool Pam. That dog t.shirt is awesome. I am SOOOO trying this. Thanks for explaining the hows and whats....
ReplyDeleteOhhh I am completely obsessed with contact printing at the moment. I've never seen anyone else doing it before now. These look ace.
ReplyDeleteThanks for the tips PAm, I have been thinking about this for a while, how do a have a go and see if I like it without needed a screen. YOurs turned out great.
ReplyDeleteIt's actually a LOT easier if you stick the contact onto the screen first and you can print several t-shirts with the same design if you do this. You can even wash the screen with the contact on it and reprint in other colours. I teach this method in my workshops. Have fun!
ReplyDelete