Sunday, February 21, 2010

Getting ready for winter - Kayla assymetrical jacket

Just writing this post is making me feel hot. We are in the middle of a hot February and here I am making fleecy cardigans and corduroy pants (to come). And I will happily blame it all on the Ottobre magazine, that too damn good Finnish pattern design company that have the opposite seasons to us downunder (they are shovelling snow whilst we swelter away in the heat). Their Winter issue (albeit fantastic) arrives in the middle of Summer, and the Summer issue in Winter...

Enough complaining.

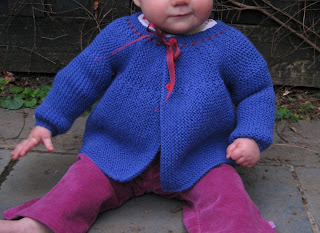
The pattern is the Kayla hooded jacket from Ottobre 3/2009 issue (which I just noticed was their Summer issue, not even a Winter issue. That's what happens when you live so close to the arctic circle I guess). The fabric is a cotton blend fleece. Fluffy on the inside so good for winter (ie not now). Lined with hot pink cotton lycra in the hood. It was the first time I have ever used snaps (instead of buttons or a zipper) on the front panel and they were super easy. Finished with some hot pink binding.

I forgot to take a close up photo of the hem, but there is some twin stitching along the bottom jacket and sleeve hems. Gives it a very professional finish, but also caused some minor distress with a certain broken twin needle about 5cm before the finish line...
Its still a bit too big. But this is a good thing as there is still some growing to do before Winter hits. It was pulled out on a chilly early morning walk to the park a couple of weeks ago (before it was completely finished). Just for a test drive. It worked fine, did all the things a jacket should do. Plus she looked super cute. Next is a skirt to match.

Monday, February 15, 2010

More legs

Two more pairs of leggings this week for an 18 month old. The pattern is the Lola leggings from Ottobre Summer issue 3/2009. These leggings are genuinely so easy so make, each leg is one piece of fabric so the method is simply sew the inner leg and crotch seams, hem the bottom and add the waist band. I have some very cool red/purple/black stripey knit that I want to make for myself, but I don't have a big person's pattern so I might try to wing it tracing the pattern from a pair of bought leggings. We'll see how we go.
The blue pair are made from a very lightweight stretch denim, and are finished with twin stitching. I used two different colours for the twin stitching - yellow and hot pink (although the colours don't show up very well in the pic) - to give them a bit of edge.
The pink pair are made from a plain cotton jersey. The flower is hand embroidered and adds a little girly touch (as if the pink wasn't girly enough...)
Again, more twin stitching on the hems and waistline. I've done a few project now with the twin needles here and here and I am definitely improving in my technique. And learning a lot along the way.
I signed up for My favourite February challenge which was sewing with knit fabrics, check out the others signed up for more stretchy goodness.

Thursday, February 11, 2010

My creative space with automobiles

This week in my creative space is a sneak preview of a project recently finished.
Its all about automobiles, bright colours and summer.

But I can't show you the whole thing. Its a present for a friend. Or for their little dinosaur. So instead you get to see little bits and pieces.

It turns inside out. It has a nice stripey brim to shade out the sun.
And a neat round top to hold it in place.Hopefully it is liked by its owner to be.

What mysteries are going on in your creative space? Check out Kootoyoo to connect with others.

Monday, February 8, 2010

Cecile jersey blouse and more twin stitching

I signed up for February challenge - sewing with knit with Carolyn from My favourite. I've been sewing with knit, or stretch, quite a bit lately. Its a challenging fabric, however I've been learning some new techniques, having some successes, some failures.

I didn't start this project this month, I started it a while ago at Perle 8's, but joining Carolyn's challenge, motivated me to finish it. Its made from a a gorgeous brightly coloured cotton knit (probably elastane, but it came from my stash so I can't really remember). The pattern is Ottobre Cecile jersey blouse from the 3/2009 issue. The pattern was lovely. It has some cute shirring on the front and is flared.
There were a few hiccups along the way. I struggled, ALOT, with the binding on the neckline. However I learnt a little trick along the way. Sewing stretch knit to stretch binding was very difficult. It kept stretching too much and turned out all warped. I unpicked and restitched it three times before I was happy with it. I ended up attaching interfacing to the back side to stops it from stretching whilst I sewed the ribbing on the first time, then I pulled it off before I top stitched it. It still stretched a bit, however then I picked up a tip from somewhere (although I can't quite remember where). I used the steam function on my iron over it, and it tightened up nicely. The heat brought the materials back to shape. Whilst still not perfect, it was definitely satisfactory. The twin stitching is also a tad wonky, but that I can live with.
First attempt.
Third attempt (I didn't bother with photographing the second, it just went straight to unpicking).
Finally, after steam ironing.
The shirring on the bodice was done with elastic thread hand woven on to the bobbin and a normal thread on top. This is such a simple technique but looks very effective.
I got to do some more top stitching using the twin needle. I am absolutely loving this new gadget (despite last week's very frustrating broken needle incident...) This time is turned out really well and the hints I got from Kadiddlehopper (a very talented and inspirational sewer) some time ago paid off. I reduced the tension and the puckering between the twin lines of stitching was no more!
Things I learnt along the way:
  • Steam ironing is your friend. It did a great job on reducing the warped stretch of the neckline and arm ribbing. Not perfect, but over time, improving my technique and the steam iron and I should get this under wraps.
  • The fabric generally stretched along the seams, particularly when top stitching. I washed the garment half way through and this seemed to straighten everything up again. On reflection, perhaps a go over with the steam function on the iron also might have fixed it.
  • Reducing the tension when using the twin needle stopped the fabric from puckering between stitch lines.
  • Shirring is easy peasy
Its the next size up for my 14 month year old, so I am thinking it will do her for Winter (with layering) and maybe even Summer next year. Here she is testing out her new blouse and choosing the next thing for me to make..

Thursday, February 4, 2010

My creative space

How lovely to be back...
Although to start off my year of creative spaces, I am sharing a frustrating moment.

I was THIS (imagine finger and thumb not very far apart) far from finishing - yes I mean finishing - my latest project. When one of the needles on my twin needle broke...

Just like that.

Very calmly, I managed to make it to my local haby store to pick up a replacement (plus a few other bits and pieces - making it worth the trip). But I was not impressed. Now the challenge of finding the time to finish it.

Head on over to our lovely My creative space host Kirsty at Kootoyoo for (hopefully) less frustration, more construction.

Saturday, January 23, 2010

Op shop treasures, waiting for some crafty love

Winter is not far away, so I've started thinking and preparing for the winter wardrobe. Over the past few months, I've found the above collection of various tops, jumpers and pants from my visits to op shops. All are in good condition (two even still had the tags on them!), no stains, and all are plain boring items, crying out for some embellishments. Actually a couple have ridiculous decorations (a pink poodle with the words underneath - born to shop!?), but these will quickly disappear.
So over the next few months, I have a bit of work to do. The embellishments I was thinking of were
- reverse applique for the pink poodle (that way I get the pleasure of cutting him out completely!)
- patchwork patches for another
- frills for the bell bottom pants
Plus I have a couple of pants and skirts I plan to make up, so I will have to add embellishments to match.
I know its only the middle of summer still, but thoughts are already heading towards the next season. Nothing like being prepared I say!

Wednesday, January 20, 2010

summer tops

I've added a couple of new tops to the bubba's summer wardrobe. Both were existing plain tops that I added some detail to to jazz them up. The first I started a while ago back here, when I did some dining table screen printing. I finally completed this one the other day by finishing the flower and stitching edges around the petals. Came up rather nicely in the end (particularly because this embellishment was inspired by the need to hide a stain that I couldn't remove.)
The second t shirt was just a plain whitey from target. I unpicked the sleeves from the top at the front and added some gathered fabric leftovers I had lying around. Then restitched the seams. The ruffle edges are raw and there are actually a couple of layers of different fabrics in each ruffle, so now that I have washed it a couple of time, it is starting to fray a little which adds to the look. I think this one is my favourite (although who knows how I am going to manage keeping it white...) as she does look especially cute in it.

Friday, January 15, 2010

Learning to crochet - the beginning

So our weekend away camping was wonderful, albeit VERY hot. Not good weather for concentrating on anything or fiddling around with a big ball of yarn in one's lap. However, my Mum and I persevered and I have now started to learn to crochet. This was my first effort at crochet. Having been a bit of a crochet snob in the past, I had decided it was time to lower my nose and give it a go. And didn't it come back to slap me in the face. It was hard, fiddly (the weather didn't help) and I just couldn't get it (and neither could my Mum). The stitches were uneven and all I could manage was a plain single chain. Every time I tried to turn it into a double or triple stitch, it turned into knots. I didn't find Pip's instructions very helpful (although I hesitate to lay all blame on the author - there may have been some interpretation difficulties there too...).

So after about 1 hour I had this.
Twisted, too tight, too loose, grubby and of no use to anyone. I spent most of the time undoing and starting over again. I think my skills definitely lay in the automatic department (give me my sewing machine any day). However, not to be too negative, I am determined to continue and will not give up straight away.
And our camping trip was really lovely. There was a creek alongside our campsite where we spent most of our time keeping cool in the hot weather.And the baby had an absolute ball playing in the dirt and mud most of the time, or being spoilt by her grandparents and aunt. I took a photo of her sound asleep, in her shorts (made by me), sleeping on her blanket (made by me). I love looking at this picture, it brings a smile to my face.
So now I admire all those that can crochet, whipping up granny squares or scarves in their spare time. And I look forward to joining those ranks some day. Maybe one day.

Monday, January 11, 2010

Confronting the inner crochet snob

So we’ve got a few days away camping in the country. Looking forward to some fresh air, long relaxing walks, gourmet camping meals and spending time with my family. Looking forward to a getaway from the suburban heat and busi-ness of life.

We go away camping quite often. My skills and passion are mostly centred around my sewing machine so it is always a challenge for me to think of things I can do whilst I am away without electricity. I usually drag a couple of magazines along with me to flick through looking at pictures and getting ideas. And whilst I would hate to downplay the importance of pouring over beautiful magazines to stimulate the creative juices, it is hardly a replacement for actually making things.

So this camping trip I have decided to challenge myself.

I have a confession. I am a crochet snob. I have always thought it to be an old fashioned, out-of-date and something that nannas do. I have seen other people’s blogs showing their latest granny squares or other crochet creations and commented “lovely bright colours!” or ‘how creative!”, but I have always thought deep down, crochet is not for me. I do cool stuff, not crochet. I have seen a picture of somethingerother, and thought how cool and different it was. Then read the print underneath only to find out it is crochet, so I loose interest. Oh, I don’t think it is so cool after all – its crochet.

So now. I’ve decided its time to confront my inner crochet snob.
I am armed with:
- Meet Me at Mikes craft book (a very thoughtful Christmas present) with Pip Lincoln’s ‘how to crochet’ instructions (this will also fulfil the need to pour over beautiful pictures and inspirational ideas without actually doing anything)
- a ball of lovely speckled yellow yarn
- a metal crochet hook (according to Pip, for ‘extra slipperiness’)
- my Mum who used to crochet once upon a time, who thinks that she might remember again
- a long weekend away with plenty of time for relaxing and fiddling around with learning new techniques

I am not sure what I want to make yet, but figure I will play around for a bit and see what turns out.

Wish me luck. If all else fails, by the end of writing this post I have finally learnt to type crochet rather than crotchet. So I have at least gained something!
Eds note: oops, this post was meant to be posted before we went away. We're back now so the results coming soon...

Saturday, January 2, 2010

New born baby gift and getting my sewjo back

Ooh and aren't I starting off the year on a good note!

My brother in law and partner had a brand new little baby boy on Tuesday. To welcome little Ollie, I made a few things to make his introduction to the world a little nicer.
A printed muslin wrap to keep him comforted in the hot summer months to come. The edges are bound in bright yellow binding. Cute animal print muslin. I loved the colour combination of the blues with the fresh lemon yellow. I hope the new Mum did too!

A couple of burping towels, finished with the same theme of the muslin print and lemon yellow.
And finally a chew blanky to match. These chew blanky (otherwise known as tag rags) are so easy to make; cut out two squares of bright fabrics, attach a few left over bits of ribbons and notions, sew it all together, and babies love them!
The whole set ready to be wrapped and gifted.
I was especially pleased with my effort as I have been finding it a little hard to get into the making stuff of late. Sewing action has been nearly zero. But I was energised and motivated to get this one done, so fingers crossed, I may have finally gotten my sewjo* back! Yippee!
* Compliments to Selena's Vintage who introduced me to the term 'sewjo' a while back. Potentially I thought this to be such a cool term when I first heard it that I was subconsciously looking for the opportunity to loose my 'sewjo' just do I could claim to have my 'sewjo' back. Hmm, only time will tell.

Friday, January 1, 2010

Happy New 2010!

**Happy New Year fellow crafters**

The start of a new year and the start of a new decade.
I've decided to look forward to the new year rather than back to the year just past.

Although I should pay my dues to 2009 with a quick wrap up as it certainly was a significant year in my life. In 2009...
  • I had my first year on maternity leave from a full time career. Because of this I rediscovered my creative flair and my love of sewing and making things. The Melbourne Stitches and Craft show was a real inspiration for me and got the ball rolling by introducing me to a whole new world of craft, blogging and some amazing people. (I honestly had no idea that such an amazing crafty community was out there!)
  • In July I stopped being an anonymous blog peeper and started my own blog! I also joined the great Perle 8's group and met more amazing people.
  • I had the pleasure of watching my friend Nic of Yardage Design make a dream come true in creating a crafty business from scratch. Nic is a real inspiration and has documented the whole journey on her blog. It is definitely worth checking out.
  • In December by little baby girl turned one. It was time to return back to work, albeit part time.

So in 2010, there are more exciting challenges to come. The end of 2009 saw me going back to work, getting busy and just never finding the time for dragging out the sewing machine (although there were plenty of longing glances into the spare room cupboard where machines, stash and notions are all kept safe). Or turning on the computer to be inspired by all the bloggy creativeness. I have learnt my lesson many years ago on making aspirational and unrealistic new years resolutions that never stick.

This year I look forward to continuing my lovely blog, continuing to make and create lovely things, learning new techniques and finding new inspiration.

We have a house move/renovation/extension thingy to plan and do.

And finally I hope to find that balance between motherhood, wife, domestic goddess (did I say earlier I was going to avoid unrealistic expectations?), part time career, home renovation project management, and finding time for my passion for sewing and craftiness (plus all the other very important things).

So Happy New Year to you all! I look forward to joining in with your adventures in 2010 and I hope you enjoy being a part of mine!

Tuesday, December 15, 2009

Madness, a 1st birthday and blue food dye

Time flies. Christmas is just around the corner. We've had two birthdays, I've started back at work two days a week, trying (very unsuccessfully) to get organised for Christmas. I've had the flu. Not much time left for anything else.

We had our first ever 1st birthday party a week ago. It was a small affair, with plenty of good food, family and laughter. The baby (who is no longer considered a baby anymore!) got a new birthday dress for the day. (Yes, I was up till 11pm the night before finishing it, always leave everything to the last minute...) It did the trick for the beautiful sunny day that we had. The pattern was from the Ottobre Summer 09 magazine, the same Toffee Tunic as the one I made a while ago here. Except I omitted the sleeves (a time saving strategy as whilst they are cute sleeves, they took the longest to make). Here is the tunic in action, featured along with the blue icing smothered mouth and hands, after having devoured the blue layer of her piece of cake..
The cake was decorated in layers of bright coloured icing, to look like a stacking ring toy - the favourite toy at the moment. It was lovingly decorated by Camille, my sister, and received a squeal of delight (and hopefully recognition) when it was brought to the table.
And those layers were brightly coloured! All in all a great day and lots of fun.
The Christmas list has been a bit neglected (ie some projects randomly started, nothing finished), can I get focused and ready in time? Christmas, here we come!

Wednesday, December 2, 2009

An oven makeover

A visit to Nic from Yardage Design earlier this week. To check out the brand spanking new range of tea towels she has created. The marvels of this amazing lass as she turns her dream into a reality.
I was lucky enough to come away with this spunky number which has now transformed my humble oven into a showpiece for the blog (Ok, maybe that was a bit over the top. Just keep looking at the tea towel and ignore the oven). It is made of beautiful hemp/organic cotton (we are back on to the tea towel again), lovingly hand printed in a blue colour to match my house (so thoughtful Nic!). It has a really nice feel to it. I don't know how I will ever go back to using a cheap old tea towel again. Check out Nic's blog for more of her new range of tea towels!
Seems this week carries a made by others theme (two similar posts constitutes a theme doesn't it?). Hope you are having a good week!

Sunday, November 29, 2009

Knitted cardi

I know. Who ever thought a knitted item would appear on this blog? I can't knit.

However I can't pretend to take credit for this little cutie. But I can put it up here for others to appreciate the beautiful work of our friend Lyn, who so kindly knitted it for my little baby girl (we have had it a few months and got plenty of wear out of it during the cold Winter days that now seems so far away). It was knitted as one piece, in a beautiful cornflower blue. The top yoke bit actually stretches (because of the type of knit used). It is fastened with three buttons at the top and a ribbon threaded along the neckline.
And, there is a quaint little story to go along with it.
Lyn saw the cardi on display in a wool shop in Kyneton, whilst shopping for wool, and asked for a copy of the pattern. The lady in the shop advised that it was from a book she had from the 1950's and that she was not sure how it would copy as it was very old and quite dilapidated. She disappeared out the back and came back with a very scratchy photocopy of the pattern. It was from this that the cardi was knitted. The pattern was extremely hard to read and had to be guessed in some places where words appeared to be missing.

The introductory words to the pattern were:
Baby Layette - one for the novice
This jacket, worked sideways in one piece, and in easy garter stitch, would be within the capacity of the beginner and would be useful for expectant aunts and grandmothers who may feel their needles have become a trifle rusty.

How quaint! (And try reading that in one sentence without a breath!)
I am so glad she did as it is a really cute little cardi (or sorry, baby layette, to be precise). And the buttons are a favourite with the bubs. Luckily Lyn's needles were not too rusty! And thanks also to Robyn for choosing the buttons and the cute tartan ribbon trim. This one will definitely be kept for future use!
So I am sorry to disappoint, but its not my knitting prowess here. My grandmother did teach me to knit once as a child. I think I knitted half a sock or scarf or something but that memory is a tad vague. Something I'd love to learn, but perhaps for another time. In the meantime I appreciate the talent and generosity of others. Thank you Lyn!

Monday, November 23, 2009

screen printing with contact

Oops. Has it really been a week and a half since I last posted? Where did that time go? No idea, but I have been neglecting this poor little blog. Time to give it some TLC I think!

Although it hasn't been a time completely void of crafting (but it must have been very busy with some other very important things, I'm sure...) I got into a bit of screen printing, or the very easy do-it-on-the-dining-room-table method using contact (the clear adhesive plastic used for covering books with), a sponge roller and some fabric ink.

Two projects came to life. A t shirt for my hubby for his birthday and a little decoration for a plain top for the baby. The t shirt is my favourite as it is of our (beautiful lovely friendly) dog Max, who can be seen in the non 2D version on our last camping trip here. I enlarged and printed out a favourite photo of Max. Traced the outline onto the contact. Using a sharp blade, cut out the shape from the contact so you are left with a reverse out of the picture. Then, you hold the sheet of contact over the t shirt, very carefully pull away the backing from the contact whilst trying to stick the contact flat to your item to be printed. This is the trickiest part really, particularly if you have a large picture to print!. Then, once it is stuck down well, you roll or paint your ink in the cut out. Pull the contact off and you have yourself a great screen print!

The print is then ironed from both sides, a lot! The fabric ink jar said to iron for 15 mins, but I can't imagine the fabric would have withstood that, so I just ironed it a lot. The pic is after it has been washed too, so obviously I ironed it enough to set the ink! (A quick iron might have made the final product look a little more impressive too, but I think I was all ironed out by that stage).

I'm sure there are plenty of good tutorials out there (with a few more photos - I always get so carried away in my projects, that I often forget to take photos until the very end!), however I learnt this simple technique at a workshop during the Melbourne Stitches and Craft Show from the very talented Tegan over at Ink & Spindle.

The other print was the base of a daisy, inspired by a a small but obvious stain that I can't seem to remove in the wash. Not overly exciting yet, but this one is a work in progress, as I need to add some material and a bit of sewing to bring this to life. But the print is a start!

Wednesday, November 11, 2009

my creative space

...is freakin out about Christmas.
After reading this recent post on starting the Christmas present-making by Bianca Jae makes stuff I got inspired. I realised I had this ideal in my head that I would make a few presents for my family and how wonderful it would all be. I also realised that unless I got busy, and committed, an idea is all that it would ever be.
So this week my creative space is about jotting down my Christmas ideas, so I can get started and take some action. So far we have
Belts for the two sisters in law. Fabrics belts like this one I made a little while ago.
A bag for Mum. I'm thinking a clutch bag. I need to investigate patterns as well as fabrics!
Skirts for my sisters. Feature panel skirts, but I won't go into too much detail as I know my sisters sometimes peek this blog and I don't want to get hopes up, or spoil the surprise if I get around to it..
XXX for the hubby. (You'll have to wait until after Christmas for this one as I know he often checks out the blog)
Pram blanket and pram insert for the pram. (O.K. I don't actually give presents to my pram usually, but these two need to be done)
A quilt for my baby daughter. We'll see how this one goes though.
There it is. In writing, in all its green and red Christmas glory.
Head on over to Kootoyoo for more creative freaks.

Tuesday, November 10, 2009

A sun hat and to tell or not tell?

My mother's group are having a birthday party for all our babies this week as they are all turning 1 in the next month or so. I can't believe how quickly they grow up, however it is certainly a fun journey to see your little baby grow, develop and become a person (its times like these we forget about all the challenges and struggles along the way. Challenges? What challenges?) Anyway, I stray from the point. So, for the big birthday, Mum's group are doing a present for each of the babies, like a Kris Kringle.

I was sitting there on the weekend, thinking what could I buy for the present? As this is my first child, I really don't have much experience with children so I have no idea what to get for my own daughter, let alone coming up with a gift for somebody else's. Enter the sunshine which has beamed down upon us here in Melbourne the past few days. Aha! a sunhat. So I set off to find a sunhat pattern. I couldn't go past Nicole Mallalieu design for hat patterns so jumped online to order my kids hats pattern (which has also recently been recommended to me by Mary at Perle 8's). And check out the very talented Nikki Cardigan's gorgeous hats of the same design. But sitting back twiddling my thumbs until Mr snail mail delivered my pattern didn't sit very well with me. I dragged out my trusty Ottobre Summer 2009 mag and made the sun hat ot of that.
Its a four panel hat with a brim. I was really impressed with how it turned out. Never having made a hat before, I thought they would be tricky and fiddly. But it all went together easily and worked really well. The fabric I used had rather large, sparse pattern on it so all the pieces were strategically cut out to highlight the fabric. Classic pink spots to match on the binding and on the ties (under the chin, which I added as the pattern didn't have any). I can't imagine a child's hat without some sort of under chin tie as they always seem to be pulling them off. It is fortunate my Mum's group has 8 girl and only two boy babies, so a pink hat has good odds of finding the right home.

The problem I am stuck with now is that I have put my love and effort in to create what I believe is a beautiful hat. What if the recipient (or the recipient's mother) doesn't like the hat? And do I tell that I made it myself (and avoid either being embarrassed if no one says how gorgeous it is, or equally so if they go on about how amazing I am to have made it (not that I think this, but others can often be a bit over the top in admiring something they don't think they could achieve). Or do I keep quiet, and just let what ever happens happen? And if they don't like it, can I ask for it back? Although how would you know if they don't like it (people rarely say so when given gifts). What if they hate it, but they feel compelled to put it on their baby every time we have Mum's group in the future so as not to offend me? This would be the worst. So is it just me thinking way too much about the whole gifting of handmade items, or do other people have the same worries?

At least I still have a mail package from Nicole Mallalieu to look forward to this week. And I have my handmade hat to look at, sitting on the dining table until it gets wrapped and gifted on Thursday. Until then...

Monday, November 9, 2009

Cap sleeves and a pocket

A bit of refashioning work today, grabbing spare time when I can. The top is to match with these bright bloomers made a couple of months ago. The purple singlet was a hand-me-down, so I jazzed it up with some cute gathered cap sleeves and a sweet little pocket made out of the same fabric as the shorts. Cap sleeve detail.
Summer seems to have hit us here in Melbourne in a big way these past few days, so it is time to get this summer wardrobe stocked up. This is the complete outfit.
I love a refashion project, making something boring and common into bright, happy and individual. And so quick to complete.

Wednesday, November 4, 2009

Summer top

Time to take a break from all the baby clothes production and have some me time. I picked up some gorgeous, breezy cotton voile fabric in my wanderings last week and decided to make myself a summer top. I chose Simplicity 9270 as it was probably the simplest pattern I owned and I didn't think I would get it finished if I embarked on anything too complex. So this top was whipped up really quickly, it probably took me about 5 hours to complete (yes, I call that quickly these days...) from cutting out to final hemming, along with the contract distractions of looking after a 10 month old, plus a few other household duties, phone calls etc etc. So maybe I could be rash and say, with dedicated time, this one could be made in an hour.
It is a really simple pattern, just two pieces; a front and a back with a bit of elastic gathering at the front to give it some shape. No zippers, no buttons (no button holes), no darts or easing, no sleeves to fit. Just a few seams and hems and I was wearing it and happy! The pattern did call for a facing on the neckline, but I boycotted that and instead finished it with a matching binding edge which I think came up well.
I am quite happy with it, it is probably not the most flattering top in my wardrobe, however it is light and breezy, the pattern is nice and I think it will be great for summer. Perhaps there might be time for a few more before summer hits? I think this pattern would even work well for cotton jersey.
It did rather nicely matched with a denim skirt at yesterday's Melbourne Cup Day party. Both bubs and I were dressed in homemade creations with bubs wearing this summer tunic with these navy leggings.